Q.
Why can't I hear the audio after I've done my first AVsync session
during Real Time?
A.
This question has come up before and will come up again
mostly because using Audio with your AristoCAT software
involves not just  your
CAT software but also settings having to do with the audio
hardware on your computer. If you have never recorded audio
on your computer before then there is a simple test to see
if things are working the way they should. your
CAT software but also settings having to do with the audio
hardware on your computer. If you have never recorded audio
on your computer before then there is a simple test to see
if things are working the way they should.
To test
the recording ability of your computer you can start by
doing a recording using the AVSync recorder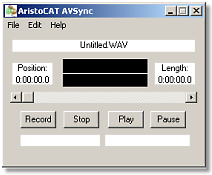
(image at left) accessible thru the AVSync program icon
in your AristoCAT folder. With your microphone plugged into
the laptop and if necessary turned on double-click on the
AVSync icon and the AristoCAT AVSync recorder will appear
(image at right). Press the 'RECORD' button and record at
least 10 seconds of audio by speaking clearly into the microphone.
Press the 'STOP' button to end the recording then press
the 'PLAY' button. If all is well then you should hear the
recording thru your computer speakers.
Of course
if everything always went as it should there wouldn't be
a need to do this article. If you don't hear anything after
doing a test recording there are a couple of things that
can have gone awry: No sound was recorded because the microphone
input level of the computer is turned down or the main output
volume and/or wave volume is turned down. In the first case
no signal is getting into the computer to be recorded. In
the second case no signal is getting out of the computer
because the volume is turned off.
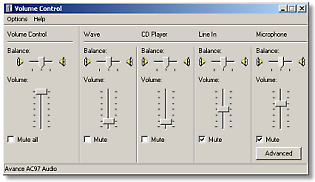
To check these settings click on 'START>PROGRAMS>ACCESSORIES>ENTERTAINMENT>VOLUME
CONTROL'. This will bring up the computers Volume
Control interface which looks like a mixing board (image
at left - this display can be customized so yours may look
slightly different).
Volume Control setting determines the overall output
level of audio on the computer.
Wave determines the output level for wave files (AristoCAT's
audio files are recorded in the wave format).
CD Player controls the audio output for music CD's.
Line In is an input channel for non-microphone sources.
Microphone controls the input levels from your microphone.
In order
for AristoCAT's AVSync program to work properly all the
components of the audio recording and playback must be properly
set. It is always wise to first test out the recording and
playback process before you start using AVSync in your work.
If everthing is set properly then you should be able to
successfully record during an Real Time session and playback
while in the Edit program.
Q.
I've just loaded the AristoCAT software on a new computer
and when I try to translate a file I get an 'idx error' message.
I loaded my dictionary. Is there something wrong with my dictionary?
A. An idx error message means the software is looking
for your dictionary but cannot find a dictionary named the
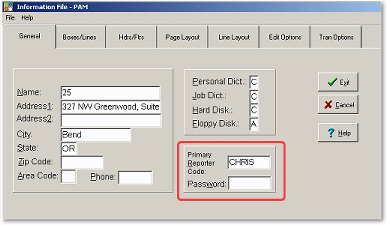
same as the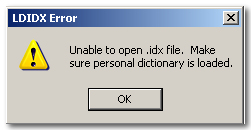 Reporter Code used when the software was installed on the
computer. Whenever the AristoCAT software is installed on
a new computer the first part of the process is a request
for a Reporter Code. Most people use their first name or initials
to create this Reporter Code identity. Once you type in the
Reporter Code a folder with that name is created and all the
AristoCAT programs will point to that folder. If your Reporter
Code is 'Chris' then when you open the Edit program the software
will look in the 'Chris' folder for your work files. The Reporter
Code is also the name of your dictionary.
If,
however, you entered a different Reporter Code into the computer
during installation from what you originally used during earlier
installations such as using your initials instead of your
first name then the software will not be able to locate your
dictionary and the idx error message will appear during translation
or when you start Real Time.
To
determine the correct name of your dictionary open the File
Management program. To the right of the upper window look
for the area title 'View Files of Type'. Click the black drop-down
menu arrow and from the list select 'Dictionary Files'. Now
all files associated with you dictionary are listed in the
upper window. Find the file which ends with the extension
'*.PER'. If it says 'CHRIS.PER' then your Reporter Code should
be: CHRIS.
 There
are a couple of ways to deal with this. The preferred method
is to create a correct Reporter Code in your computer and
then reload your dictionary. First open the ACAT Main Menu
program. Under the heading 'Set-up>Reporter Folders' select
'New Reporter Folder'. A window will appear. Type in your
correct Reporter Code and click the OK button. A new Reporter
Folder has now been created. Next use the same menu but select
'Change Reporter Folder', A window will appear. Type the same
Reporter Code you used to create the new Reporter Folder and
click 'OK'. Now all the AristoCAT programs will point to this
new Reporter Folder. Restore your personal dictionary and
everything should work fine. There
are a couple of ways to deal with this. The preferred method
is to create a correct Reporter Code in your computer and
then reload your dictionary. First open the ACAT Main Menu
program. Under the heading 'Set-up>Reporter Folders' select
'New Reporter Folder'. A window will appear. Type in your
correct Reporter Code and click the OK button. A new Reporter
Folder has now been created. Next use the same menu but select
'Change Reporter Folder', A window will appear. Type the same
Reporter Code you used to create the new Reporter Folder and
click 'OK'. Now all the AristoCAT programs will point to this
new Reporter Folder. Restore your personal dictionary and
everything should work fine.
Q.
Should I be using the a Job Dictionary list when doing Real
Time?
A.
Not necessarily but you should familiarize yourself with
process just in case you want to use it in the future.
Essentially a Job Dictionary List is a way to apply several job
dictionaries to a Real Time
session without having to merge dictionaries together.
In addition, you can determine in what order the job
dictionaries will be searched and used. The program will
then maintain the named list (named for the current Real
Time session) of those job dictionaries so you
can access it again and again.
This
process of using a job dictionary list seems most useful to
folks doing complex Real Time work.
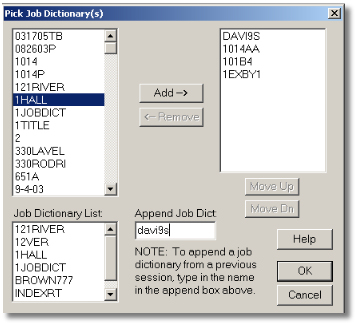 Once
you have clicked on the 'EDIT LIST' button in your Real Time
options screen the window at right will appear. The area to
the left of the window contains every job dictionary in your
Reporter Folder. The window to the right is where selected
and added job dictionaries appear. To add a job dictionary
simply select a job dictionary in the left window and press
the 'ADD' button and it will appear in the right window. You
can add as many job dictionaries as you want. The way these
job dictionaries are applied during translation is
determined by their position on the list. If you have 2
dictionaries with identical steno entries but different
English defines the dictionary highest on the list will take
precedent over the one below during translation and so on.
You can change the order of the list by using the 'MOVE
UP/MOVE DN' buttons to shift a job dictionaries position.
You can also remove a dictionary from a list by using the
'REMOVE' button. Once
you have clicked on the 'EDIT LIST' button in your Real Time
options screen the window at right will appear. The area to
the left of the window contains every job dictionary in your
Reporter Folder. The window to the right is where selected
and added job dictionaries appear. To add a job dictionary
simply select a job dictionary in the left window and press
the 'ADD' button and it will appear in the right window. You
can add as many job dictionaries as you want. The way these
job dictionaries are applied during translation is
determined by their position on the list. If you have 2
dictionaries with identical steno entries but different
English defines the dictionary highest on the list will take
precedent over the one below during translation and so on.
You can change the order of the list by using the 'MOVE
UP/MOVE DN' buttons to shift a job dictionaries position.
You can also remove a dictionary from a list by using the
'REMOVE' button.
Now here
is where it can get a bit confusing for some folks. If you
have not created a named job dictionary beforehand whenever you
start a Real Time session a blank job dictionary named for
the job is created. A job named 'smith' will have a job
dictionary named 'smith'. If you decide to use a job
dictionary list the dictionaries in the list are applied
during translation but do not become part of the 'smith' job
dictionary. Now it is possible to append a different job
dictionary to the current dictionary. The appended
dictionary will contain all the entries from the previous
job dictionary. To do this Pick Job Dictionary window select
a dictionary from the left window, add it to the right
window then type in the name of the dictionary to append in
the area marked 'APPEND JOB DICT.'
As with
all AristoCAT programs there is detailed information
available to the user whenever you click on the HELP button.
Q.
What is the difference between globals and my dictionary?
A. I'm
not sure why there seems to be some confusion about globals
and the dictionary but I suspect it might be a carry-over
for some other CAT software terminology. Regardless of the
reason for the confusion the issue has come up several times
in support calls when someone is trying to describe a
problem and they conflate the two terms. The distinction in
AristoCAT is sharp:
Global- Globaling only takes place in the Edit program
and refers to applying a change throughout a transcript.
When you make a define regardless of whether it be a
misspelled word or untranslate and you decide to add or keep
the 'g' after you've pressed the backslash the Edit program
will then search for any other instances of matching text or
untranslated steno and change that instance. If you elected
to put or keep a 'j' or 'd' after the backslash it will also
add the change to either your job dictionary or personal
dictionary.
Dictionary- The dictionary is only applied to the
transcript during translation. Any changes you make in your
dictionary after a file has been translated will not affect
the translated file.
Since we're
taking the time to talk about the these two aspects of the
AristoCAT Translation software I thought it might be helpful
to review some
 program
features which will allow you to be more efficient in your
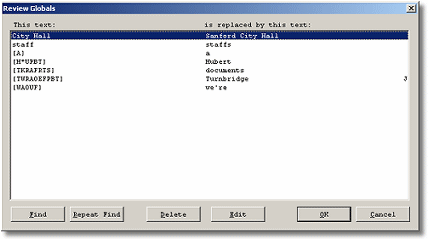
use of the software. While working in the Edit program you
can review and edit your list of globals applied to the
current job and edit your personal dictionary without having
to exit. To review your globals for a job simply press
Ctrl+QG and the window at the left will appear. From this
window you can 'Find', 'Delete' or 'Edit' any entry in the
list. This is particularly helpful when you've made an
incorrect global and you will be using the same global file
for a continuing case and don't want the error to carry
over. program
features which will allow you to be more efficient in your
use of the software. While working in the Edit program you
can review and edit your list of globals applied to the
current job and edit your personal dictionary without having
to exit. To review your globals for a job simply press
Ctrl+QG and the window at the left will appear. From this
window you can 'Find', 'Delete' or 'Edit' any entry in the
list. This is particularly helpful when you've made an
incorrect global and you will be using the same global file
for a continuing case and don't want the error to carry
over.
Another feature
of the Edit program which folks are surprised to hear about
is the ability to edit/remove entries in your dictionary
from the Edit program. Most AristoCAT users are familiar
with the process of recalling steno : Alt+S once will
display the steno notes for the current job, Alt+S twice
will recall the English translation as well. Once the steno
window appears at the right side of the Edit program you can
then use the Up/Dwn arrow keys to scroll the steno. There is
a yellow highlighting bar which identifies the Steno/English
currently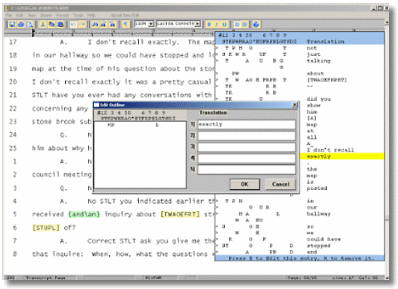 selected. If you press the 'E' key on the keyboard the
program will display the Edit Outline dialog which is used
most often when in aspects of the Dictionary
Management program. From here you can edit either the steno
or English of an entry in your dictionary without having to
change programs. If you want to remove an entry press the
'R' key when the highlight is over appropriate entry.
Q.
How do I convert my AristoCAT Personal Dictionary for use in
my new writer?
A.
This questions has come up quite a bit lately with
more and more reporters buying Stenograph's Úlan Mira and
now ProCAT's Stylus writer. The process is different from
our earlier dictionary conversion program for the
Stentura8000. Under the new procedure we give you
 the
utility to convert your AristoCAT Personal Dictionary into
the RTF/CRE format. The resulting file will then be used by
the vendor supplied software and converted into the
dictionary format used by the writers. the
utility to convert your AristoCAT Personal Dictionary into
the RTF/CRE format. The resulting file will then be used by
the vendor supplied software and converted into the
dictionary format used by the writers.
Note: Stenograph offers dictionary conversion
software to customers with active Úlan Mira support and
ProCAT supplies the conversion utility when you purchase the
Stylus writer. These conversion programs are not associated
with AristoCAT and any questions about their installation or
use should be directed to the vendor.
To
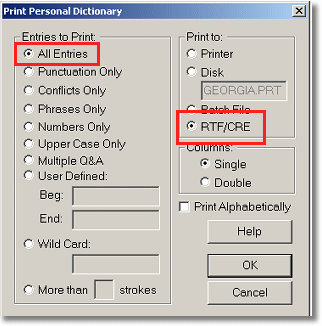
convert your dictionary to RTF/CRE first open the AristoCAT
Dictionary Management program and under the heading
'Personal Dictionary' click on the menu item 'Print Personal
Dictionary' or with the Dictionary Management program open
press CTRL+P. The Print Personal
Dictionary dialog window will appear. First make sure 'All
Entries' is selected under 'Entries to Print' and under
'Print to:' select 'RTF/CRE' (highlighted in red on image).
Next click on the 'OK' button and after a minute or so
(depending on size of dictionary and speed of computer) you
will see a confirmation window telling you your dictionary
has been printed (converted to RTF/CRE). At this point in
your Reporter Folder is a file named for your AristoCAT
Personal Dictionary (this name is also referred to as your
Reporter Code and is usually your first name or initials)
with an *.RTF extension.
 Next
you will have to get access to this RTF in order to import
it into the vendor's conversion software. The easiest way is
to move the *.RTF onto a floppy diskette and then use that
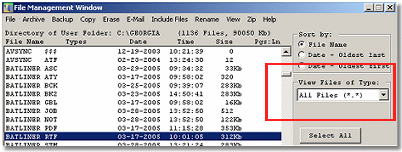
as your source for the dictionary. Open AristoCAT's File
Management program. To the right of the upper window there
is a drop-down menu area called 'View Files of Type'. Select
'All Files'. Now everything in your Reporter Folder is
displayed in the upper window. Find the *.RTF file named for
your Reporter Code and simply copy to your diskette. If the
RTF file is too large for a floppy you will need to use
another storage device (Flash Drive, CD) or use Windows
Explorer to locate the file in your Reporter Folder and
copy/move to another location. Next
you will have to get access to this RTF in order to import
it into the vendor's conversion software. The easiest way is
to move the *.RTF onto a floppy diskette and then use that
as your source for the dictionary. Open AristoCAT's File
Management program. To the right of the upper window there
is a drop-down menu area called 'View Files of Type'. Select
'All Files'. Now everything in your Reporter Folder is
displayed in the upper window. Find the *.RTF file named for
your Reporter Code and simply copy to your diskette. If the
RTF file is too large for a floppy you will need to use
another storage device (Flash Drive, CD) or use Windows
Explorer to locate the file in your Reporter Folder and
copy/move to another location.
From
this point on you will have to follow the instructions
included with the vendor's dictionary conversion software.
Note: If, when you get to the 'Print Personal
Dictionary' options dialog, there is no setting for 'RTF/CRE'
you are not working with the latest version of AristoCAT
software. If you have installed the December 03 Masterload
but not installed updates from the website or an update CD
then the RTF/CRE selection will not appear. If you are not
current with support and did not receive the December 03
Masterload you will not be able to update your software to
include this feature. Please call 1-800-727-4786 for
information on updating your AristoCAT software.
Q.
Why can't I plug in my writer cable into my new computer?
A.
First off congratulations on the new computer. Back in the
good old days there was a serial port included with every
computer. This port is where you plugged in your writer
cable. Some years back the computer industry decided to use
a standard plug for all hardware devices instead of
different plugs for each device. Hence the USB (Universal
Serial Bus) port was created and the serial port was
consigned to history.
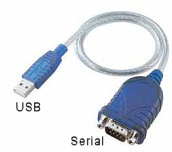 In
order to plug your writer into your new computer you will
have to purchase a USB/Serial Adaptor (prices range from $39
to $65). This hardware device acts as a bridge between the
writer cable and the computer. Along with the hardware it is
necessary to install driver software into the computer in
order for a com port number to be assigned to the USB plug.
When you first plug the adaptor into a Windows XP computer a
balloon will appear at the lower right corner announcing 'New
Hardware Found'. Clicking on this balloon will start the
New Hardware Wizard and prompt you to insert the CD/Floppy
disk with the products drivers. In
order to plug your writer into your new computer you will
have to purchase a USB/Serial Adaptor (prices range from $39
to $65). This hardware device acts as a bridge between the
writer cable and the computer. Along with the hardware it is
necessary to install driver software into the computer in
order for a com port number to be assigned to the USB plug.
When you first plug the adaptor into a Windows XP computer a
balloon will appear at the lower right corner announcing 'New
Hardware Found'. Clicking on this balloon will start the
New Hardware Wizard and prompt you to insert the CD/Floppy
disk with the products drivers.
Once
the drivers are installed you will need to determine what
com port number has been assigned to the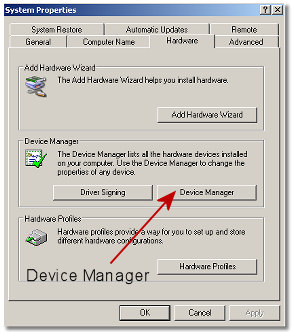 USB port in order to make a change in you AristoCAT
Information File. To discover the com port number assigned
to your USB port you must access the Device Manager. First
plug in your USB/Serial Adaptor and then find the 'My
Computer' icon on your desktop or under the Start Menu.
Place your cursor on the icon and right-click once. A small
menu will appear. Select 'Properties' from the menu.
A window called 'System Properties' will appear and
under the tab 'Hardware' you will find a button for
the Device Manager. Clicking on 'Device Manager' will open a
window showing all the devices connected to your computer.
Click on 'Ports' and you should see a listing for your
USB/Serial Adaptor and in parenthesis the com port number
assignment. Once you've determined the number open your
Information File and under the tab 'Tran Options>Real Time
Options' put the number in the area 'Com Port'.
Note: If, when you look at the Port listing in the
Device Manager, there is a yellow caution sign next to the
listing for your USB/Serial Adaptor it means the drivers are
not properly installed or the device is not working
correctly.
Q.
I've accidentally added some misspelled words to my
proofreading dictionary. Can I edit this list?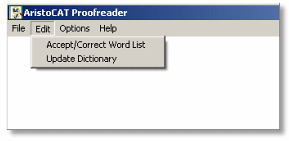
A.
Yes. Just
as in other AristoCAT programs the Proofreading program has
a background window where you can set preferences and gain
access to your Update Dictionary or Accept Word Lists. To
access the Proofreading background window first click on the
Proofreader program icon in your AristoCAT Program Folder. A
list of *.wrk files will appear. Click the CANCEL button.
You will now see the Proofreader background window (image
left). From this window you can access Accept/Correct Word
Lists, the main Update Dictionary and the Proofreader
Preferences.
The
Update Dictionary for the Proofreader contains words that
you add during a proofreading session. These are words that
are correctly spelled, but are not in the main spell check
dictionary. Examples of such words would be names, cities,
etc. that come up often while proofreading transcripts and
you do not want the proofreader to stop at. To access the
Update Dictionary click on the drop-down menu selection 'Update
Dictionary' from the Proofreader Background window
'Edit' heading menu and this window will appear: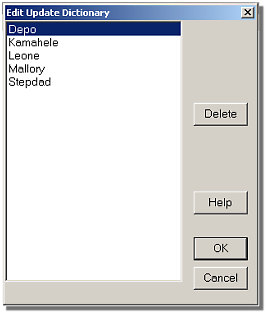
To delete a word from the update dictionary, use your
up/down arrow keys to highlight the word you wish to delete,
then press the Delete key or click on the Delete button. A
delete warning window will appear confirming the entry
delete. Simply click 'YES'.
A file
is also automatically created by the proofreader program
that contains a list of all of your accepted and corrected
words for a particular job. If you exit the proofreader
before the end of the transcript and then resume your
proofreading at a later time, the proofreader will know not
to stop at those words that you accepted earlier. You can
elect to append this list of accepted and corrected words to
another transcript. If this box is checked, then each time
you proofread a transcript for the first time, you will be
prompted if you want to append the accept list from another
transcript. If this box is not checked and you wish to
append the accept list from another transcript, you can do
it manually on the proofreader menu under File. Note: The
accept file only contains words that you have chosen as
Accept All and Correct All. The accept file does not contain
words that you have accepted or corrected once.
You
can also set preferences for the Proofreader by clicking on
the heading 'Options>Set Preferences'.
For
the week of 1/30/05-
Q.
Why do I have to keep resetting my Real Time com port setting?
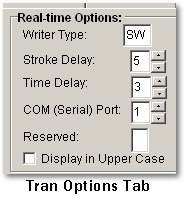 A.
This
has come up more frequently over the last year or so. The
permanent setting for your Real Time com port assignment
is in your Information File under the tab Tran Options.
You can also change the com port setting for Real Time on
an ad hoc basis when you first begin a Real Time session
and get to the Real Time Options screen. If the you
change the com port setting in the Real Time Options
screen it is changed for that session only and will revert
back to the permanent setting in the Information File next
time you begin a Real Time job. In order for the change
to be permanent you must change the com port assignment
in your Information File. A.
This
has come up more frequently over the last year or so. The
permanent setting for your Real Time com port assignment
is in your Information File under the tab Tran Options.
You can also change the com port setting for Real Time on
an ad hoc basis when you first begin a Real Time session
and get to the Real Time Options screen. If the you
change the com port setting in the Real Time Options
screen it is changed for that session only and will revert
back to the permanent setting in the Information File next
time you begin a Real Time job. In order for the change
to be permanent you must change the com port assignment
in your Information File.
Because
most new laptops no longer have a serial port (once standard
on all computers) the preferred method for connecting your
writer to your computer is a USB/Serial Adaptor. Using an
adaptor will change your com port assignment to something
other than the default com port 1 (usually com 4, 5 or 6).
If you bring a personal dictionary backup from an older
computer into the newer computer the Information File (which
is part of the personal dictionary backup) may still have
the original com port 1 setting. At that point it is a simple
thing to change the assignment in the new computer but if
you should go back again and backup on the old computer and
restore on the new computer you will overwrite that change.
This
becomes an issue when you have a laptop used for Real Time
and a desktop PC used mostly for editing. Of course when
you finish editing on the desktop PC you want the dictionary
additions/changes moved to the laptop. Normally this means
doing a backup on the desktop and restoring to the laptop.
To make sure you don't change the com port assignment when
you restore your dictionary change the permanent setting
under Tran Options in your Information File on the desktop
PC.
Don't
forget to change the com port setting in all your Information
Files used for Real Time jobs.
For
the week of 1/12/05-
Q.
Can I rename a work file (*.wrk) without having finished
editing?
A.
Yes,
though you would not want to rename just the work file (*.wrk)
before you're finished editing. Whenever you begin a job by
reading in a note file, creating a job dictionary, translating
and finally opening the work file you are creating linkage
between all these different aspects of a job. The linkage
is the name of the job. When you read in a file from your
writer or start a Real Time session you are prompted to name
the job. For the sake of this example let's use the name 'smith'.
We start with the note file called 'smith.not'. If you build
a job dictionary for this job we end up with another file
called 'smith.job'. When you translate and open the job we
end up with an edit file called 'smith.wrk' and a global file
called 'smith.gbl'. These fiiles, all named the same, work
in concert. If you change the name of just the work file (*.wrk)
you break the chain and would then not be able to, say, recall
steno while you were editing.
This doesn't mean
it can't be done it just means you have to rename the entire
chain of linked files. AristoCAT's File Management program
makes this a very simple process, really no different than
if you were to rename a single file. We would suggest you
backup all the files under their original name on an external
media (floppy drive, CD-drive or Flash Drive) before renaming
just for safety.
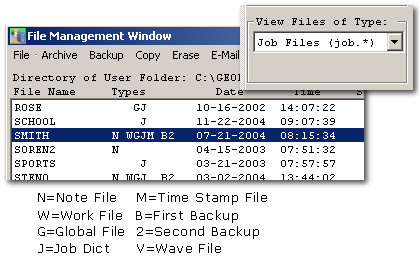 When
you open the File Management program the upper window displays
the files in your Reporter Folder on the computer. At the
right of Reporter Folder area there is a drop-down menu area
called 'View Files of Type'. This feature allows you
to display only those types of files you're interested in
viewing. One of the selections for this area is 'Job Files'.
This catagory allows the File Management program to display,
on a single line, all types of files named the same. To the
right of the name of the job a series of letters will appear
and each letter denotes a type of file. Selecting the single
name will select all files of the same name. Then its a simple
matter to click on the heading 'Rename>Rename on Hard Disk',
type the new name in the prompt window and all files associated
with a job name will be changed at once. A window will appear
displaying the number of files which have been changed. When
you open the File Management program the upper window displays
the files in your Reporter Folder on the computer. At the
right of Reporter Folder area there is a drop-down menu area
called 'View Files of Type'. This feature allows you
to display only those types of files you're interested in
viewing. One of the selections for this area is 'Job Files'.
This catagory allows the File Management program to display,
on a single line, all types of files named the same. To the
right of the name of the job a series of letters will appear
and each letter denotes a type of file. Selecting the single
name will select all files of the same name. Then its a simple
matter to click on the heading 'Rename>Rename on Hard Disk',
type the new name in the prompt window and all files associated
with a job name will be changed at once. A window will appear
displaying the number of files which have been changed.
This feature is
also handy when you want to copy all files associated with
a job to an external medium in order to finish your work on
a different computer.
For
the week of 1/10/05-
Q.
Am I able to apply time stamps to my printed transcripts?
A. The
simple answer is yes but there are conditions which need
to met first in order for time stamping to work properly.
The most common method for time stamping is to use AristoCAT's
Real Time program to create the transcript. During Real
Time a time stamp (*.tim) file is created by default. This
time stamp file will be named the same as the job. This
file gathers time data from your computer's clock so be
sure it is set accurately. If you should move your files
from one computer to another for final editing then be sure
to move the time stamp file as well.
It is also possible
to create time stamps outside of a Real Time session if
your writer supports this feature. A Stentura8000 writer
will create a time stamp file (*.hms) on the diskette if
the feature is turned on and the clock on the writer is
correctly set. Refer to your Stenura8000 manual for more
information.
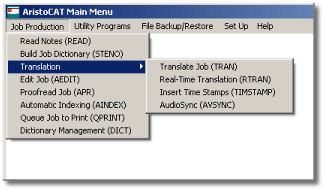 Once
you've completed all editing and have inserted the necessary
include files you must run the AristoCAT Time Stamp program.
From the ACAT Menu under the heading 'JOB PRODUCTION' select
'TRANSLATION>INSERT TIME STAMPS'. Next an Open File window
will appear displaying your work files. Select the appropriate
file and click 'OPEN'. Next a window will appear giving
you options for how you want the time stamps applied. Once
you've completed all editing and have inserted the necessary
include files you must run the AristoCAT Time Stamp program.
From the ACAT Menu under the heading 'JOB PRODUCTION' select
'TRANSLATION>INSERT TIME STAMPS'. Next an Open File window
will appear displaying your work files. Select the appropriate
file and click 'OPEN'. Next a window will appear giving
you options for how you want the time stamps applied.
Time Stamp Options
gives you the ability to select either 'ACTUAL' or 'ELAPSED'
time stamps. 'ACTUAL' refers to a real time display. If
the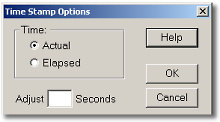 job begins at 10:15 a.m. the transcript will display 10:15
a.m.. 'ELAPSED' means the time stamps will start at 00:00
and begin counting up from that point. There is also an
adjustment area where you change the time stamps by a seconds.
Once you have applied time stamps to your transcript make
no editing changes. If you should need to make any alterations
in the transcript you will need to reapply the time stamps.
Once the time
stamps have been applied you can print your transcript.
Once you have selected the file to print the print options
window will open. Here you must select 'Print Time Stamps'
and decide whether you wish to print the time stamps on
the left or right side of the transcript.
|


